
How Can Beginners Get Started with ClickUp™ for Smarter Project Management?
- Manali Sharma
- Apr 15, 2025
- 4 min read


In today’s multitasking world, staying organized is no longer just a luxury, it’s an absolute necessity. Whether you're running a business, orchestrating a product launch, or simply trying to juggle personal goals and daily responsibilities, effective organization sets the foundation for success. That’s where ClickUp™ comes in as a powerful ally. More than just a task manager, ClickUp™ is a comprehensive digital workspace designed to handle all aspects of your project management needs. From tracking tasks and managing time to fostering collaboration, creating documentation, and automating workflows, it simplifies your processes while keeping everything seamlessly connected.
Whether you're a novice venturing into the world of project management for the first time or transitioning from another tool, this guide will equip you with clear, actionable steps to maximize the potential of ClickUp™. Dive in to learn how to transform your approach to managing tasks and projects, making your work smarter, not harder.
Why ClickUp™?

Here’s a powerful visual showing how ClickUp brings it all together, project management, knowledge handling, and real-time team communication in one smart platform:

Step-by-Step Setup for Beginners
Step 1: Sign Up and Set Up Your Workspace
Create an Account: Visit ClickUp.com and sign up using your email address.
Verify Your Email: Check your inbox for a verification email and follow the instructions.
Set Up Your Profile:
Avatar: Upload a profile picture or choose an avatar.
Theme Color: Select a theme color that suits your preference.
Create Your Workspace:
Workspace Name: Name your workspace (e.g., "My Projects" or your company's name).

Naming Your Workspace Team Size: Indicate if you're working solo or with a team.

Step 2: Understand ClickUp's Hierarchy
ClickUp™ uses a hierarchical structure to organize tasks and projects.
Workspace → Your overall organization.
Spaces → Departments or major categories (e.g., Marketing, Personal, Freelance).
Folders → Groupings within a space (e.g., Campaigns, Clients).
Lists → Actual project or task containers within a folder.

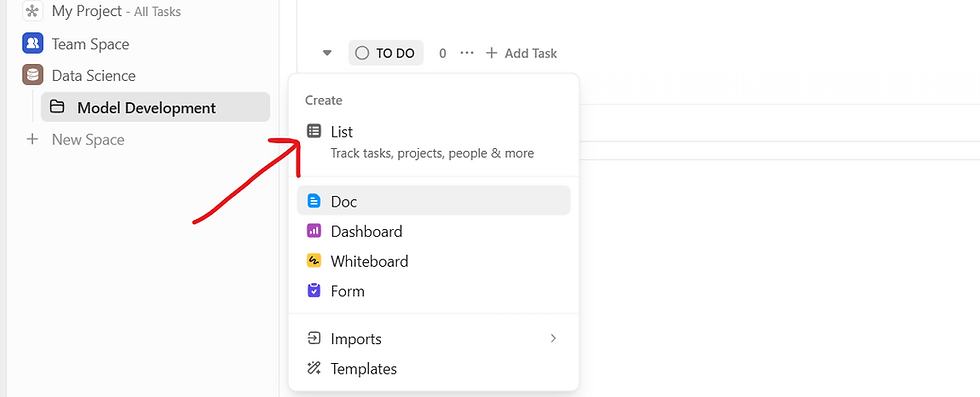
Step 3: Create Folders, and Lists
How to do it:
Add Folders: Inside your space → Click “+ Folder” → Give it a name (e.g., “Model Development”).

Create Lists: Within the folder → Click “+ List” → Name it according to your project (e.g., “Image Classification”).
Step 4: Add Tasks and Subtasks
ClickUp is built around tasks, so now’s the time to build your to-dos.
Add a Task: Open a list → Click “+ Task” → Name the task (e.g., “Task01”) → Assign to yourself or a team member.
Add Details to Each Task
Set a due date
Add priority level (Urgent, High, Normal, Low)
Attach files
Leave comments or instructions
Use Subtasks Break large tasks into subtasks for clarity (e.g., under "Website Design," you could add subtasks like “Homepage,” “About Page,” “Contact Form”).

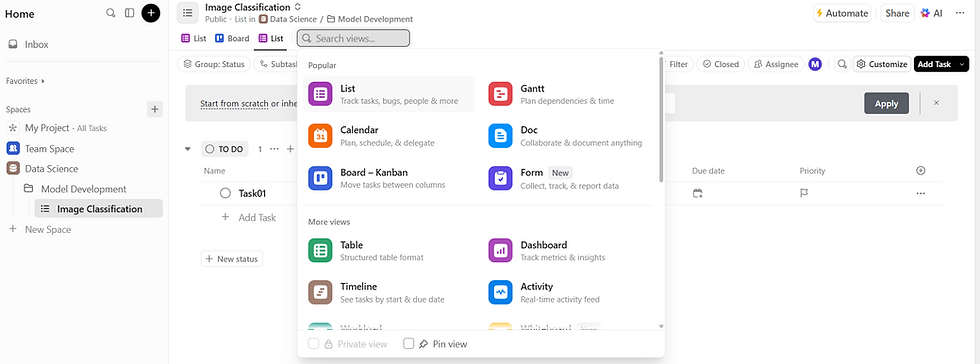
Step 5: Choose and Customize Views
ClickUp offers flexible ways to see your work. Start simple:
List View (Default) – Great for task tracking
Board View (Kanban-style) – Visual drag-and-drop format
Calendar View – See tasks based on deadlines
Gantt View – Ideal for timelines and dependencies
Go to any list or folder → Click “+ View” to try out different perspectives.
Step 6: Try Templates to Save Time
ClickUp has templates for:
Project management
Personal to-dos
Agile workflows
Client onboarding
Social media calendars
Go to a list/folder → Click “Templates” → Browse or search → Apply with one click.

Step 7: Use Docs for Notes, Wikis, or Collaboration
ClickUp Docs lets you write documents within your workspace perfect for:
Meeting notes
SOPs
Team manuals
Brainstorms
Sidebar → Click “Docs” → “+ New Doc” → Name and write

Step 8: Explore the Inbox & Notifications
Stay up-to-date with your tasks and team:
Use the Inbox (left panel) to view:
Assigned tasks
Comments
Due tasks
Customize notifications in Settings → Notifications to avoid overload.

Step 9: Set Goals and Milestones
Track progress toward big objectives.
Click on “Goals” in the sidebar

Create a goal (e.g., "Launch Website by May 30")
Add measurable targets (e.g., “Design complete,” “Content added,” “QA done”)

Step 10: Automate Simple Actions
Want tasks to auto-assign when added to a list?
Go to Automations → “+ Add Automation” → Choose trigger + action (e.g., “When task created → Assign to me”)

Conclusion
In a world where efficiency is everything, ClickUp™ stands out as a game-changer for managing your personal or professional life. Whether you're overseeing complex data science projects, collaborating with a remote team, or simply organizing your daily to-dos, ClickUp™ brings clarity, structure, and automation to your workflow.
By following the beginner-friendly steps in this guide from setting up your Workspace and Spaces to building Folders, Lists, and using Automations you’ve already laid the groundwork for smarter work management. As you continue to explore ClickUp’s powerful features like Docs, Dashboards, and Whiteboards, you’ll discover how effortlessly it adapts to your needs.
So take control of your chaos, streamline your tasks, boost collaboration, and stay ahead of your goals. With ClickUp™, it’s not just about getting things done, it’s about getting them done better.

$50
Product Title
Product Details goes here with the simple product description and more information can be seen by clicking the see more button. Product Details goes here with the simple product description and more information can be seen by clicking the see more button

$50
Product Title
Product Details goes here with the simple product description and more information can be seen by clicking the see more button. Product Details goes here with the simple product description and more information can be seen by clicking the see more button.
$50
Product Title
Product Details goes here with the simple product description and more information can be seen by clicking the see more button. Product Details goes here with the simple product description and more information can be seen by clicking the see more button.


Comments