
How to do Version Control with Git for DevOps
- Sharon Rajendra Manmothe

- Nov 4, 2025
- 2 min read
Updated: Nov 25, 2025
Part 1: Create Your First Git Repository
Purpose: Learn how Git tracks changes locally — the first step in version control.
Steps
Create a folder

You created a project directory to store your code.
Initialize Git
git init

This turns your folder into a Git repository (Git starts tracking changes here).
Create a file
echo "Hello Git" > hello.txt
You made your first file to track.
Check the status
git status
Git shows that hello.txt is untracked.
Add the file to staging
git add hello.txt

This prepares the file for commit (snapshot).
Commit your changes
git commit -m "Initial commit: added hello.txt"
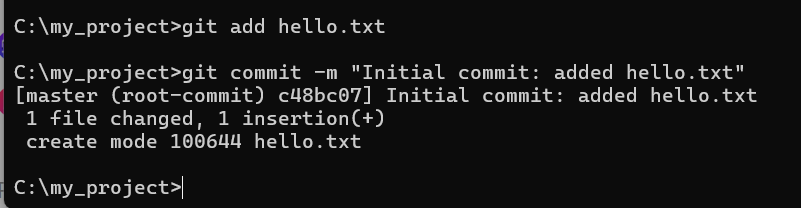
Congratulations!!! You’ve saved your first version — a snapshot of the file.
Git records your work in small “commits” that you can track or roll back later.
Part 2: Track File Changes and View History
Purpose: Understand how Git saves different versions of your files.
Steps
Edit the file
echo "This is my second line." >> hello.txt
Check the difference
git diff

Shows what changed since the last commit.
Stage and commit again
git add hello.txt
git commit -m "Added a second line to hello.txt"

View commit history
git log --oneline

See the list of all versions you’ve saved.
Lesson Learned:Git keeps a complete timeline of your work — you can see, compare, or restore any version anytime.
Part 3: Work with Branches
Purpose: Learn how to work on new features safely without disturbing the main code.
Steps
Create and switch to a new branch
git checkout -b feature-update

Edit the file
echo "New feature: Git branching!" >> hello.txt
Commit the change
git add hello.txt
git commit -m "Added feature update message"

Switch back to main branch
git checkout master

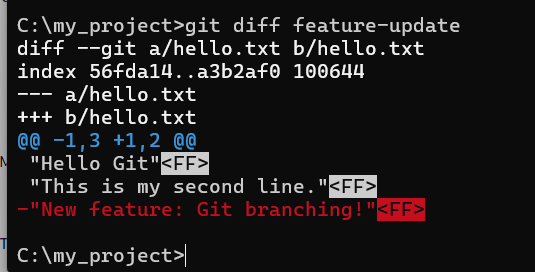
Compare branches
git diff feature-update
Lesson Learned:Branches let you experiment or develop features independently — and merge them later when ready.
Part 4: Merge Changes
Purpose: Understand how to combine your work from multiple branches.
Steps
Merge feature branch into main
git merge feature-update
Git combines the feature branch changes into main.

Check the merged file
type hello.txt

Part 5: Connect with GitHub and Push Code
Purpose: Learn to upload your local project to GitHub and collaborate online.
Steps
Create a new repo on GitHub
Go to GitHub → “New Repository” → Name it git-demo
Don’t add README yet.
Connect local Git to GitHub
git remote add origin https://github.com/<your-username>/git-demo.git
Push your code
git branch -M master
git push -u origin master

Check your GitHub accountYour code is now visible online.

Lesson Learned:Git + GitHub = version control + cloud collaboration.You can now share your code, work with teams, and track contributions.

$50
Product Title
Product Details goes here with the simple product description and more information can be seen by clicking the see more button. Product Details goes here with the simple product description and more information can be seen by clicking the see more button

$50
Product Title
Product Details goes here with the simple product description and more information can be seen by clicking the see more button. Product Details goes here with the simple product description and more information can be seen by clicking the see more button.
$50
Product Title
Product Details goes here with the simple product description and more information can be seen by clicking the see more button. Product Details goes here with the simple product description and more information can be seen by clicking the see more button.


Comments